How to Pull the Perfect Espresso Shot: The Dial-In Tutorial
Affiliate disclosure: Sweeter Grind is a participant in the Amazon Services LLC Associates Program. We may earn commissions on qualifying purchases at no extra cost to you.
There is a moment, somewhere in your first month with a real espresso machine, when the shot you just pulled tastes nothing like espresso. It's bitter and thin, or sour and watery, or it gushes through in 12 seconds, or it chokes the machine and drips for 50. You stare at it. The internet says "just dial it in." Nobody says exactly how.
This is how. The recipe at the top, the four levers underneath, the puck inspection ritual after, and the specific diagnostic — what does the bad shot tell me, and what do I change next? — that turns randomness into a daily 60-second routine.
The recipe to start with, every time, no exceptions:
| Variable | Target |
|---|---|
| Dose in | 18g |
| Yield out | 36g |
| Ratio | 1:2 (normale) |
| Time | 25–30 seconds |
| Water temp | 200°F (93°C) |
If you haven't yet — set up your machine, grinder, scale, and tamper before reading further. The Complete Home Espresso Guide covers the four-piece setup; Best Espresso Grinders for Home 2026 covers what makes a grinder espresso-capable.
The Four Levers
Every espresso problem traces back to one of four variables. Memorize the order — this is the order you change them when something's wrong.
1. Grind size. The biggest, fastest lever. Adjust this first. Coarser = faster shot, less extraction. Finer = slower shot, more extraction.
2. Dose. Coffee in. 18g is the standard for a regular double basket; 20g for a VST competition basket. Don't change dose until grind is stable.
3. Yield. Espresso out. 36g is the standard 1:2. Pull longer (40g out) for more extraction; pull shorter (30g out) for less. Useful as a fine-tuning lever.
4. Time. A diagnostic, not a target. You do not stop the shot at 25 seconds. You stop the shot at 36g and you read the time. The time tells you whether grind is right.
When something tastes wrong: change grind first, by one or two micro-steps. Pull again. Re-evaluate. Don't change dose until grind has been stable for several shots.
Dose by Basket
The basket determines your dose, not the other way around.
| Basket | Standard Dose | Notes |
|---|---|---|
| 14g double (De'Longhi Stilosa) | 14g | Underdose at your peril |
| 18g double (most prosumer) | 18g | The default; 17g–19g acceptable |
| 20–22g VST competition | 20–22g | Tighter tolerance; better extraction |
| 9–10g single | 9g | Single shots are notoriously hard; most pros pull doubles |
If you don't know your basket size, weigh a level dose of grounds that "looks right" and check whether the puck has space below the screen after tamping (a clean fingerprint indent in the puck after lock-in = correctly dosed; a wet, soaked top = overdosed; a dry puck with space = underdosed).
Step-by-Step Guide
This is the workflow for every shot, every day. After two weeks it takes 60 seconds.
Step 1: Preheat the Machine
A cold espresso machine pulls cold-tasting espresso. Turn the machine on at least 15 minutes before your first shot (5 minutes for a Bambino Plus with ThermoJet; 25 minutes for a heat-exchange machine like the Profitec). Lock in the empty portafilter — the group needs to heat too.
Pull a "rinse shot" — water through a bare or empty portafilter — right before your first real shot. This flushes any cold water from the line and warms the basket.
Step 2: Weigh and Grind
Tare your scale with the empty portafilter on top. Grind directly into the basket until the scale reads your target dose (18g for a standard basket). Grind on demand — even 30 seconds of sitting in the basket starts staling the dose.
If your grinder has high retention (more than ~1g of grounds stuck inside between shots), purge first by running it briefly with a small dose, then re-tare and grind your real dose. The Niche Zero and Eureka Mignon Single Dose are designed for low retention; older Eureka Mignons and DF-series benefit from a single-dose hopper or RDT (a spritz of water on the beans before grinding).
Step 3: Distribute (WDT)
Coffee from a grinder lands in clumps. Clumps cause channeling. The Weiss Distribution Technique (WDT) tool — a tiny rake of needles — breaks up clumps before tamping.
Insert the WDT tool. Stir gently in small circles, working the needles down to the bottom of the basket without scraping the sides. 5–10 seconds is enough. The grounds should now look uniform and slightly fluffy.
If you don't have a WDT tool, a $5 multi-needle one from Amazon works as well as a $80 designer one. The technique matters; the tool doesn't.
Step 4: Tamp Level
Use a calibrated tamper sized to your basket (58mm for most, 54mm for Bambino Plus, 51mm for Stilosa). Press straight down with consistent pressure — about 20 lbs is standard, but past that, more pressure does nothing. Pucks compress to a fixed density; you can't make it tighter.
What matters more than pressure: level. The puck should be flat, not tilted. A tilted puck causes water to flow through the thinner side faster — that's channeling.
A calibrated tamper that bottoms out at a fixed depth removes the variability of "how hard." Recommended for beginners.
Step 5: Lock In and Start Immediately
Lock the portafilter into the group head. Don't let it sit — the basket is now in contact with the hot group, and even 10 seconds of waiting partially extracts the puck before brewing.
Place your scale and cup under the spout. Tare. Start the shot. Start the timer.
Step 6: Stop at 36g
Watch the scale, not the timer. When it reads 36g (or your 1:2 target), stop the shot. The exception: if the shot is gushing past 36g because flow is too fast, stop earlier — that's a sign for the next adjustment.
Read the timer.
Step 7: Read the Time and Diagnose
| Time | Diagnosis | Fix |
|---|---|---|
| Under 15s | Way too coarse, or massive channel | Grind much finer; check distribution |
| 15–20s | Too coarse | Grind 1–2 micro-steps finer |
| 20–25s | Slightly fast | Grind 1 micro-step finer |
| 25–30s | Dial-in zone | Taste before adjusting |
| 30–35s | Slightly slow | Taste; if bitter, grind coarser |
| 35–45s | Too fine | Grind 1–2 micro-steps coarser |
| Over 45s | Way too fine, or clogged | Grind much coarser; check distribution |
A 12-second shot with a correct dose almost always means grind too coarse. A 45-second shot almost always means grind too fine. But: if your dose is wrong, time tells you nothing useful. Confirm dose first, then trust time.
Step 8: Inspect the Puck
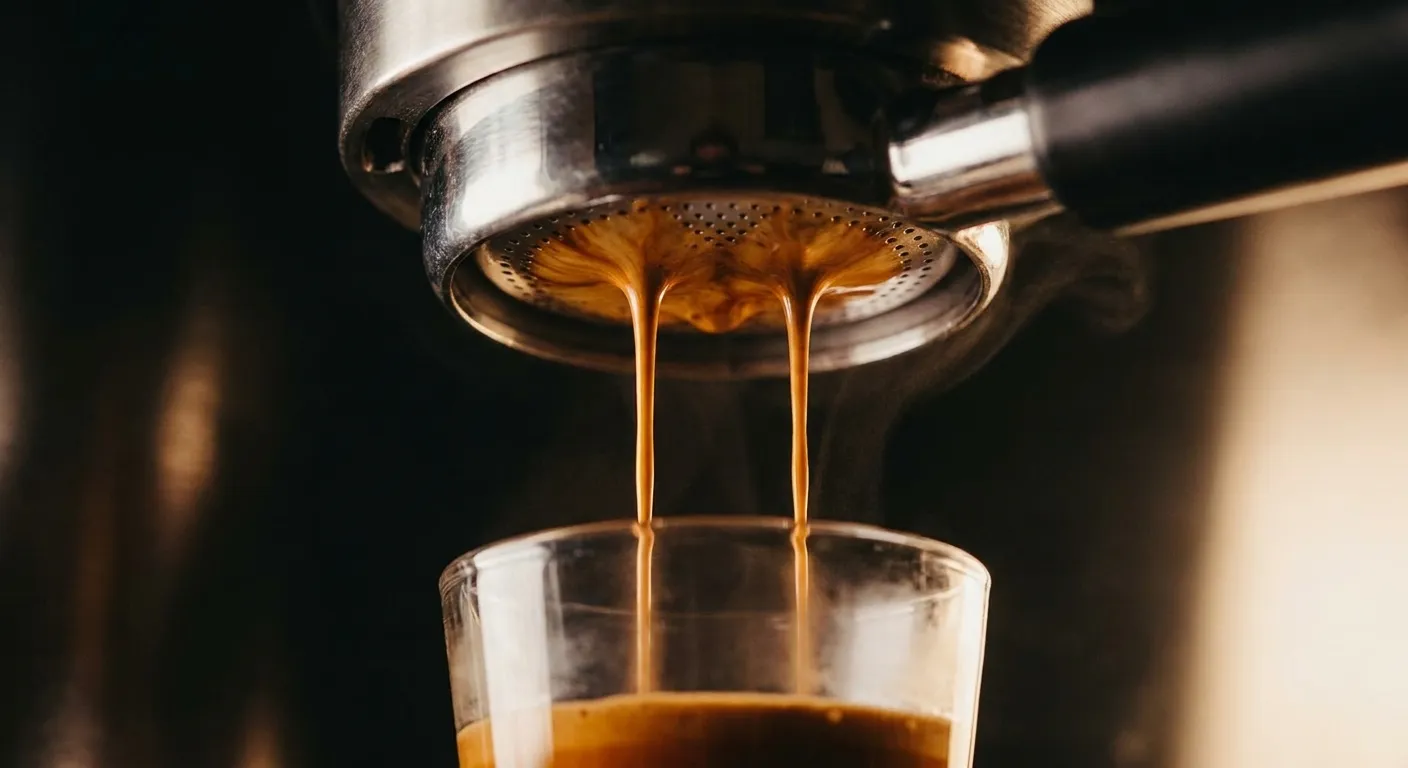
After every shot, knock the puck out and look at it. This is the single most diagnostic-rich step in espresso — and the one most beginners skip.
Good puck: smooth, dimpled top (matches the screen), uniform color, holds together as a disc. This is what evenly-extracted espresso looks like.
Cracks running across the puck: channeling. Water found a fast path through and bypassed coffee on the other side. Fix distribution next shot — more WDT, gentler tamp, check that the basket sits flat.
Holes or wet spots in the top: localized channeling. Same fix.
A wet, soaked puck that won't hold together: underdosed, or basket too small for grind. Reduce yield or check basket spec.
A dry, cracked puck pieces: overdosed and crushed against screen. Reduce dose by 0.5–1g.
Sour-tasting shot with a perfect-looking puck: under-extracted. Grind finer or extend yield to 40g.
Bitter-tasting shot with a perfect-looking puck: over-extracted. Grind coarser or shorten yield to 32g.
The Diagnosis Cheat Sheet
When the cup tastes wrong, work in this order:
| Problem | First fix | Second fix |
|---|---|---|
| Sour, thin, weak | Grind finer | Extend yield to 40g |
| Bitter, harsh, drying | Grind coarser | Shorten yield to 32g |
| Sour AND bitter (worst) | Channeling — fix distribution | Re-WDT; check tamp level |
| Watery with no crema | Stale beans, OR coffee too coarse | Use beans 7–21 days post-roast |
| Gushing fast (under 15s) | Grind much finer | Check beans aren't stale |
| Choking (over 45s) | Grind coarser | Check dose isn't too high |
| Tastes "hollow" or "muted" | Beans too fresh (under 5 days) or too old (over 30 days) | Wait or restock |
The single most common beginner mistake: changing two variables at once. Grind AND dose AND yield AND tamp pressure. After three changes, you have no idea what fixed (or ruined) anything. Change one thing. Pull the next shot. Read it. Decide.
For the deeper extraction theory behind why "sour = under, bitter = over," see Coffee Extraction 101.
When You Change Beans
New bag, new dial. Always. Different roast levels, ages, processing methods, and varieties pull at completely different grind settings.
The shortcut: when opening a new bag, start with your previous grind setting, pull one shot, read time, adjust. You'll usually be within 2–3 micro-steps. Newer beans (under 7 days post-roast) need a slightly coarser grind because trapped CO2 disrupts flow; older beans (over 21 days) need slightly finer because they've lost CO2.
If your machine and grinder both have temperature variability (single-boiler, big hopper), expect to re-dial daily. If you have a dual-boiler and a single-dose grinder, you can hold a setting for a week.
A Note on Pre-Infusion
If your machine has pre-infusion (Bambino Plus, Lelit Bianca, ECM, Profitec, La Marzocco), it gently saturates the puck at low pressure for 5–10 seconds before ramping to 9 bars. This reduces channeling and improves extraction evenness — especially useful for light roasts.
If your machine doesn't have native pre-infusion (Stilosa, Gaggia Classic), you can do a manual approximation: start the shot, count to 6, stop, count to 4, restart. It's clumsy but it helps. Most beginners don't bother and they're fine.
Tips That Save Months
Don't dial in espresso with milk drinks. Pull and taste straight shots until you have a clean, balanced espresso. Milk forgives an uneven shot. You'll never learn to read the cup if you're always drinking it through 6oz of foamed milk.
Use the Brew Ratio Calculator to compute non-standard yields (1:1.5 ristretto, 1:3 lungo) without doing the math.
Use the Brew Timer with a 30-second espresso preset if your machine doesn't have a built-in shot timer.
Buy a single bag of one bean and stick with it for a month. Dialing across multiple beans simultaneously is hard. Pick one, learn it, then move on.
Take a video of a "good" shot. Watch the flow rate, the color, the way crema forms. You're training your eye for what right looks like.
Frequently Asked Questions
Should I time my shot from the moment I press the button, or from when coffee starts flowing?
From the moment you press the button. The 25–30 second range includes pre-infusion and the first "first drops" delay. Different machines have different first-drop times (Bambino Plus first drops around 6–8 seconds; Lelit Bianca around 4–5 seconds), and that's part of the shot. If you only count post-flow time, you'll dial in too coarse.
My shot tastes great but the puck is wet and soupy. Is that bad?
Not necessarily. A wet puck with a great-tasting shot just means your basket is slightly oversized for your dose, OR your machine's pump shuts off without a 3-way valve relieving pressure. As long as the cup is good and the puck doesn't fall apart when you knock it out, ignore it. If shots get worse and pucks get worse together, then re-dose.
Why does my first shot of the day taste different from my second?
The group head is still warming up on shot 1, even after the machine indicates ready. Pull a 50g rinse shot through a bare portafilter as a "warmup" before your first real shot. Most home baristas accept the first-shot variance and just don't drink that one.
Do I need a bottomless (naked) portafilter?
Not at first. A bottomless portafilter shows you the underside of the puck during extraction — useful for diagnosing channeling visually. But if you don't yet know what good looks like, the visual feedback is just confusing. Use the standard spouted portafilter for your first month, learn the puck-knock inspection, then add a bottomless for further refinement.
My grinder won't go fine enough for espresso. Is it broken?
Probably not — it's just not espresso-capable. Many "espresso/coffee" grinders under $200 (some Baratzas, some OXOs) can technically grind espresso-fine but with inconsistent particle distribution. A grind that looks fine but produces 12-second shots at any setting means the grinder can't reach espresso. See Best Espresso Grinders for Home 2026 for genuinely espresso-capable picks.